
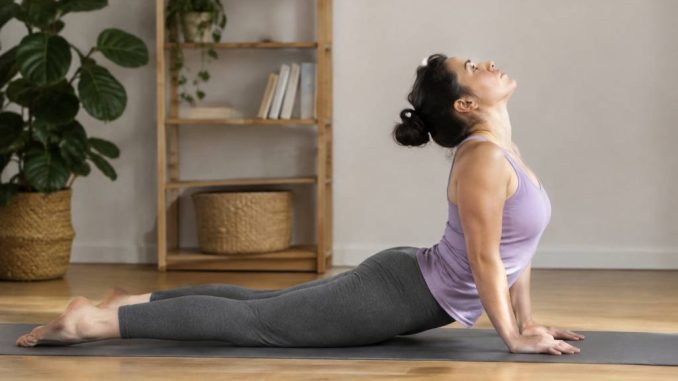
Your spine is built to move—not to stay folded over a laptop all day. Backbends can help you explore that movement, build mobility through the front of your body, and develop the strength to support a more upright posture. But “bend farther” isn’t the goal. A controlled, comfortable range is worth more than a dramatic shape that leaves your back complaining tomorrow.
Think of backbending as a team effort. Your upper back, shoulders, hips, core, and glutes all contribute. When one area is stiff or switches off, the lower back may take on more than its share. The stretches below can help you move with greater awareness and control—whether you’re a regular yogi, a weekend runner, or someone whose desk chair has become a little too familiar.
What backbender stretches can—and can’t—do
Backbends open the front of the body, including the chest, abdomen, and hip flexors, while asking the muscles along your back to help stabilize and extend your spine. Practised consistently and comfortably, they may support mobility and make everyday movements feel less restricted. They can also be a useful counterpoint to long periods spent sitting in a rounded position.
But stretching is not a fix for every kind of back pain, and no single pose guarantees a “stronger spine.” Flexibility and strength work best together. A useful backbend combines movement with muscular control, especially through the glutes, legs, and trunk. If your only strategy is to hang into your lower back, you’re not building a balanced practice—you’re asking one small area to carry the whole workout.
Before you begin, remember that bodies vary. A stretch should feel like gentle tension, not sharp pain, pinching, numbness, or tingling. If you have an existing back or neck condition, osteoporosis, a recent injury or surgery, or pain that keeps returning, speak with a qualified health professional before trying these exercises.
Set yourself up for a safer stretch
Start with five to ten minutes of easy movement: walk, march in place, or cycle gently. Warm muscles usually move more comfortably than cold ones. Use a mat or carpet for floor exercises, and keep a folded towel or cushion nearby if your knees or wrists need extra support.
Move slowly and breathe normally. Inhale to create space through your ribs; exhale as you ease into a position. Don’t hold your breath to force a deeper stretch. Keep your jaw relaxed, and avoid throwing your head backward. Your neck is part of the movement, not a handle for pulling yourself into it.
Try each stretch only within a range that feels controlled. If you notice discomfort increasing as you hold a position, come out of it. If a stretch brings on symptoms such as radiating pain, numbness, or weakness, stop and get professional advice.
Cat-cow: mobilize the spine one segment at a time
This gentle movement is a smart place to begin because it asks your spine to flex and extend without demanding a deep backbend. It also gives you a chance to notice how your back feels before you go further.
-
Start on your hands and knees, with your hands beneath your shoulders and knees beneath your hips. If kneeling is uncomfortable, place a cushion under your knees.
-
As you inhale, gently tip your pelvis forward, let your abdomen soften, and lift your chest slightly. Keep your neck long rather than craning upward.
-
As you exhale, gently round your back, draw your abdomen in, and let your head follow the movement without forcing your chin to your chest.
-
Repeat for six to eight slow cycles, moving only as far as feels comfortable.
Imagine your spine moving like a wave instead of snapping between two positions. If the movement feels comfortable, let your breath set the pace. If it doesn’t, make the range smaller or skip it.
Sphinx pose: a low-key introduction to extension
Sphinx pose is a gentler alternative to a full backbend. It encourages extension through the upper body while keeping your forearms on the floor, so you can adjust the height with ease.
-
Lie on your stomach with your legs comfortably apart and the tops of your feet resting on the floor.
-
Place your elbows beneath or just slightly in front of your shoulders, with your forearms on the ground.
-
Press lightly through your forearms and lift your chest only until you feel a comfortable stretch through your abdomen and the front of your body.
-
Keep your shoulders away from your ears and your gaze forward or slightly down. Hold for 15 to 30 seconds while breathing steadily.
Feeling strong compression or pinching in your lower back? Slide your elbows farther forward or lower your chest. You can also come out of the pose and rest. More lift is not automatically more progress.
Cobra pose: lift with your back, not your hands
Cobra adds a little more active work. The key is to use your back muscles to lift your chest, with your hands acting as light support rather than a pair of levers.
-
Lie face down and place your hands beside your lower ribs. Keep your elbows bent and close to your body.
-
Gently engage your legs and glutes, without clenching them as hard as possible.
-
Inhale and lift your chest a small amount, using your back muscles. Keep some weight in your hands and your elbows bent.
-
Pause for a breath, then lower slowly. Repeat three to five times if the movement feels comfortable.
There’s no prize for straightening your arms. If your shoulders shrug, your lower back pinches, or your ribs thrust forward, make the lift smaller. A low cobra performed with control can be more useful than a high one held with tension.
Bridge pose: bring the hips and glutes into the action
Not every backbend has to happen face down. Bridge pose works from the floor and brings your glutes and hamstrings into the picture. It can be a helpful way to practise lifting the hips without simply hinging through your lower back.
-
Lie on your back with your knees bent and feet flat, about hip-width apart. Bring your heels a comfortable distance from your hips.
-
Rest your arms by your sides. Press evenly through your feet and gently engage your glutes.
-
Lift your hips until your torso forms a comfortable slope from shoulders to knees. Keep your ribs from flaring upward.
-
Hold for two or three easy breaths, then lower slowly. Repeat three to six times.
Keep your knees pointing in the same direction as your toes; don’t let them fall wide or collapse inward. If your hamstrings cramp, adjust your foot position or lower your hips. The right height is the one you can control—not the one that makes your bridge look impressive from across the studio.
Kneeling hip-flexor stretch: make room at the front of the hips
Tightness at the front of the hips can make it tempting to create a backbend by tipping the pelvis forward and arching the lower back. This stretch focuses on the hip flexors so that you can work on the front of the hips without turning the exercise into a lower-back contest.
-
Kneel on a cushion with one foot in front, so both knees are bent. Keep your front knee above your ankle.
-
Gently tighten the glute of your kneeling leg and tuck your pelvis slightly, as if bringing your belt buckle toward your ribs.
-
Shift your hips forward a small amount until you feel a stretch at the front of the kneeling hip.
-
Hold for 20 to 30 seconds while breathing normally, then switch sides.
Keep your torso upright and your lower ribs stacked over your pelvis. You don’t need to lunge far forward. If your knee is uncomfortable, use more padding or choose a standing hip-flexor stretch instead.
Thread-the-needle shoulder opener: free up the upper body
Limited shoulder and upper-back movement can make a backbend feel more restricted. This stretch isn’t a backbend, but it can help you explore movement through your upper back and shoulders before returning to extension.
-
Start on hands and knees. Slide your right arm beneath your left arm, palm facing up, and lower your right shoulder toward the floor.
-
Rest your head on a cushion or the mat if that feels comfortable. Keep your hips roughly above your knees.
-
Hold for 15 to 25 seconds, breathing easily, then return to the starting position and switch sides.
Don’t force your shoulder toward the floor. If your neck doesn’t like the position, keep your head lifted or skip the stretch. The goal is a comfortable opening, not a wrestling match with the mat.
Put the stretches together
You don’t need a 45-minute routine to make a thoughtful start. Try this short sequence two or three times a week, leaving a day between sessions if you’re new to the movements:
-
Five minutes of easy walking or marching.
-
Six to eight slow cat-cow cycles.
-
One 15- to 30-second hold in sphinx pose.
-
Three to five controlled cobra lifts.
-
Three to six bridge repetitions.
-
A 20- to 30-second kneeling hip-flexor stretch on each side.
Use thread-the-needle on both sides if your shoulders or upper back feel stiff. You can also shorten the routine to two or three movements on a busy day. Consistency beats an occasional heroic session followed by a week of avoiding the mat.
Common mistakes that can derail your practice
-
Chasing depth. Forcing a bigger arch may shift too much pressure into your lower back. Reduce the range and focus on smooth movement.
-
Holding your breath. If you can’t breathe comfortably, ease out of the stretch. Breath-holding often signals that you’re working too hard.
-
Ignoring the hips and shoulders. A backbend is a whole-body movement. Include hip and shoulder mobility rather than expecting your spine to do everything.
-
Skipping strength. Mobility is only part of the picture. Controlled bridge lifts, gentle trunk-strengthening exercises, and regular general activity can help you build capacity alongside flexibility.
-
Pushing through warning signs. Sharp pain, tingling, numbness, or symptoms that travel into an arm or leg are reasons to stop—not badges of commitment.
How to track progress without chasing a perfect pose
Progress may look like breathing more easily in sphinx pose, lifting into bridge without your knees drifting inward, or finishing a session without feeling tense. You might also notice that standing tall after a long stretch at your desk feels a little less stiff. Those changes matter more than touching your heels to your head.
Keep the same simple routine for a few weeks and note how each movement feels. If the stretches remain comfortable, you can gradually add a repetition or a few seconds to a hold. Change one thing at a time. Big jumps in range or volume make it harder to know what your body is responding to.
Backbends should leave you feeling more aware of your movement—not as if you’ve survived a challenge you need to recover from. Warm up, work within a comfortable range, and give your whole body a role. That’s how you build a practice that supports a more mobile, capable spine one steady repetition at a time.